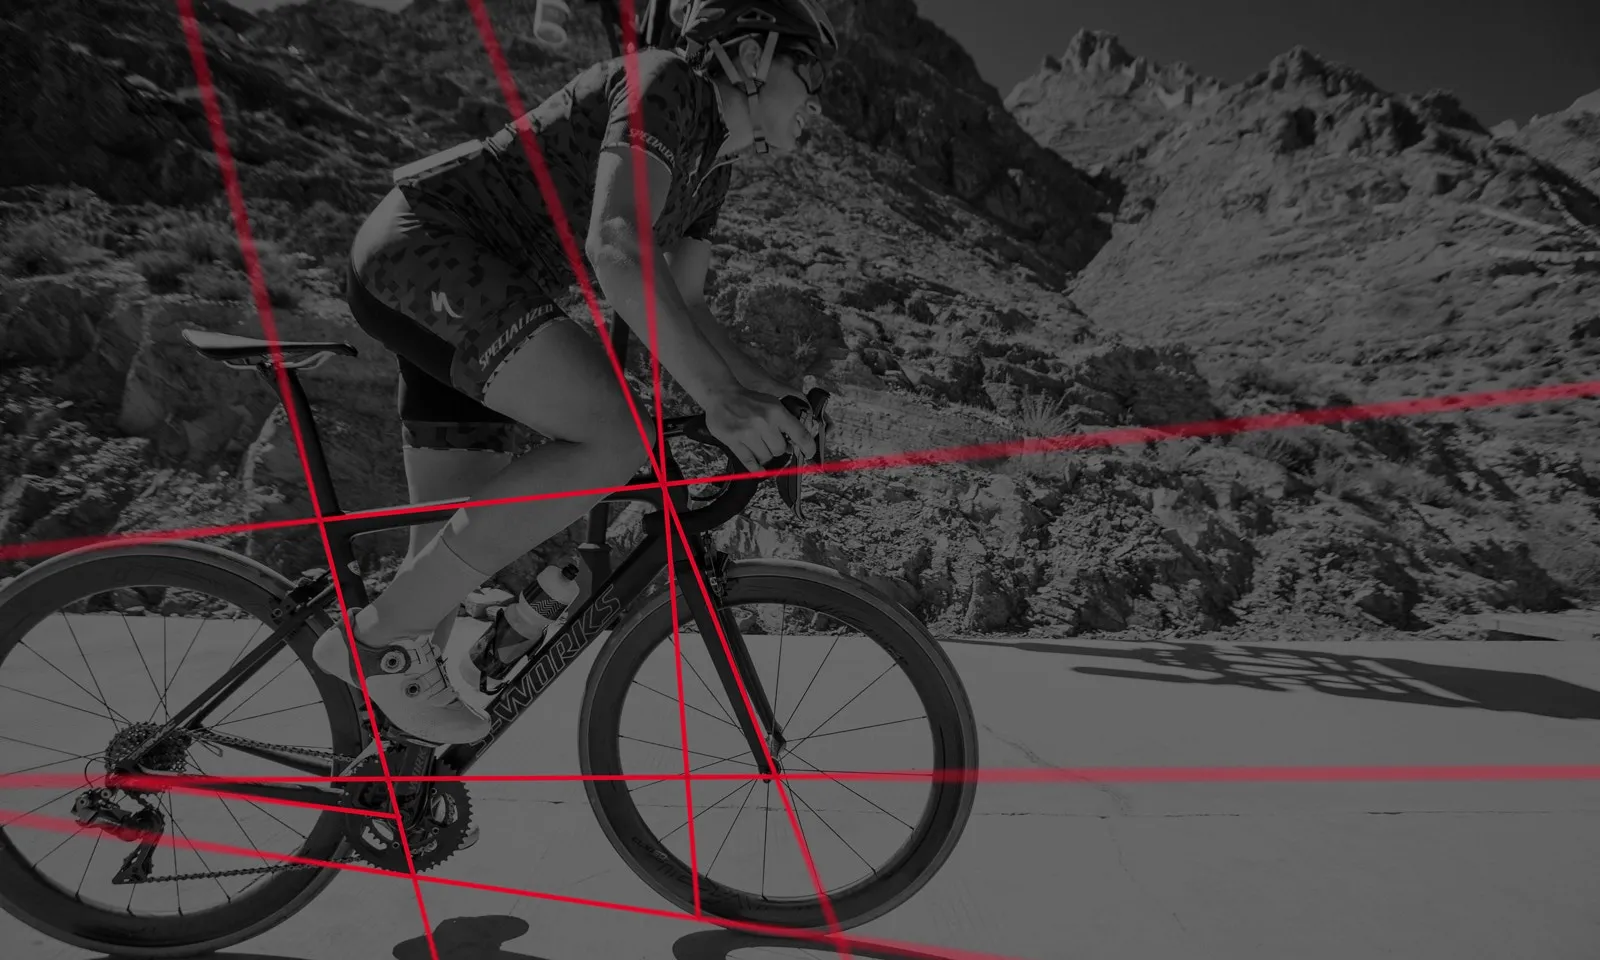
Understanding the geometry of your steed and the impact it has to your ride doesn’t have to be complicated. Bike geometry is responsible for how a bike looks, rides, and handles, and having a basic grasp of the key figures will go a long to way aiding you in comparing different bikes and what is best for you.
If you get the right size and style of bike, chances are the geometry is going to serve your purpose just right. However, if you’re keen to know about how it all works then this article spells out what each measurement refers to and how it is taken, along with how it influences ride and what you should be looking out for in bicycle geometry.
The Anatomy of a Bike
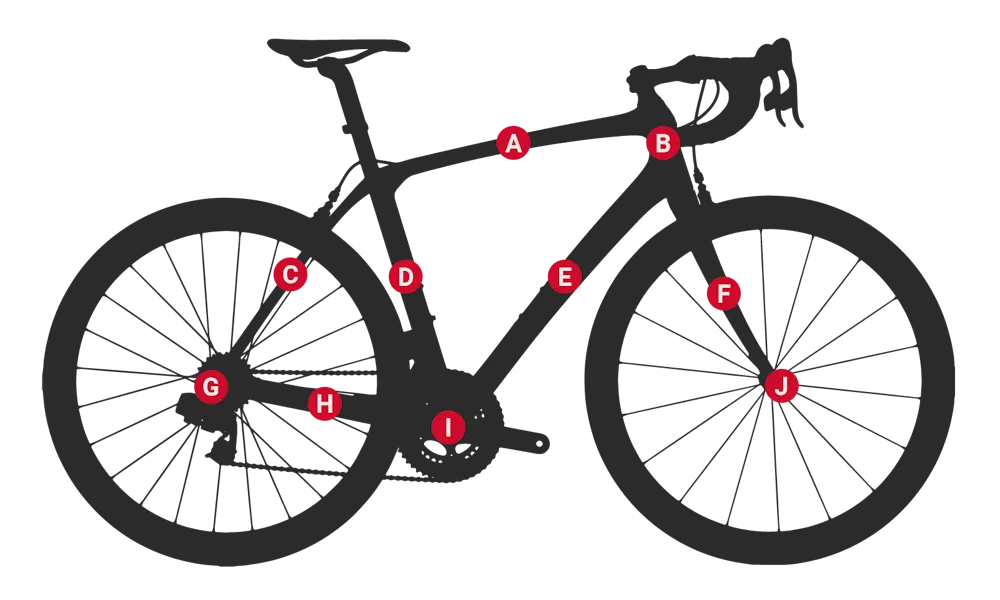
To kick things off, let’s cover the basics. The chart below highlights the key areas of a bicycle that are used to take the measurements and commonly form a bicycle’s geometry chart.
A - Top Tube
B - Head Tube
C - Seat Stay
D - Seat Tube
E - Down Tube
F - Fork
G - Rear dropout
H - Chainstay
I - Centre of Bottom Bracket
J - Front drop out
Frame Size
It's important to know straight off the top that bikes are not the same in terms of geometry and size. When manufacturers refer to the size of a bike whether it be via description like small, medium or large or via a measurement like 51cm, 54cm or 56cm, those measures are not universal or governed by any standards. Therefore knowing how to read a geometry chart is crucial to comparing different types of bicycles from different manufacturers.
Bike frames are commonly measured in centimetres or inches representing the length of the seat tube. For example, a manufacturer may measure the seat tube length of a bike as 51cm, and then describe it is a small frame. The same measurement could also be described as an x-small or small/medium depending on the manufacturer, style of bike or even region the bike is being sold. Therefore the quoted size of a bike isn't so useful when comparing across brands.
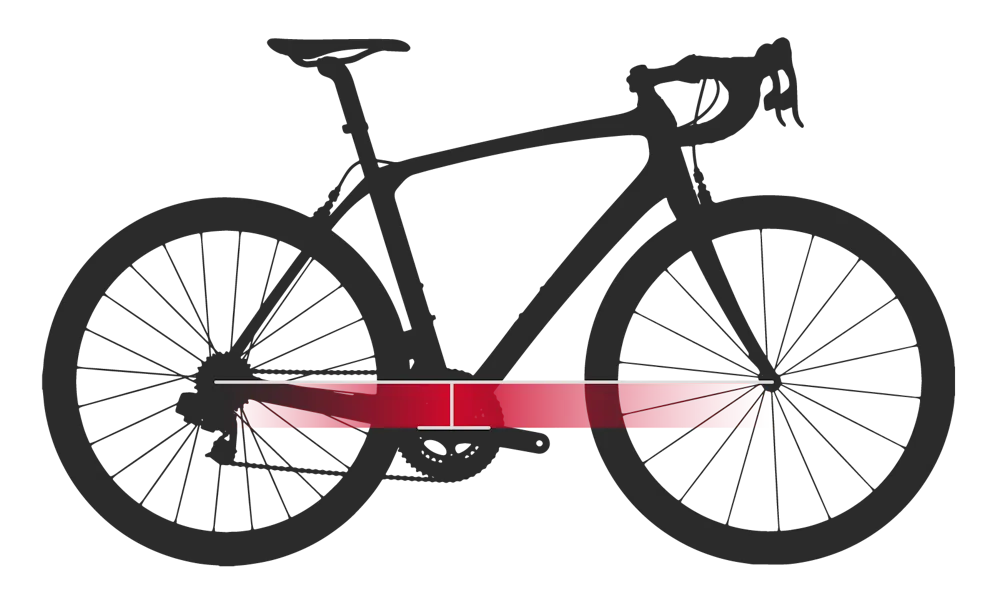
Stack and Reach

The two most fundamental elements of frame geometry are stack and reach. Knowing the bike's stack (how tall a frame is) and reach (how long a frame is) will allow you to compare between different manufacturers and immediately know if it will fit you, regardless of how it is described or what the seat tube measurement is.
Stack is measured vertically from the bottom bracket to the top of the head tube. This gives an indication of how tall a frame is. For example, endurance road bikes will typically have greater stack than more race orientated road bikes.
Reach is measured horizontally from the bottom bracket to the top-centre of the head tube. This gives an indication of how long a frame is. Looking to road bikes, performance race bikes will typically have a longer reach than endurance bikes to stretch a rider out, creating a lower frontal profile to improve aerodynamics.
Reach is also sometimes used to describe a rider's reach which is different to the frame reach. Rider reach refers to the rider specifically and is measured from the tip of the saddle to the end of the stem. Regardless of the frame reach, a rider's reach can be manipulated by changing the saddle set-back position, seatpost, and stem length.
Head Tube

The measurement of a bicycles head tube is an area of essential importance, containing two key measurements that have a direct influence of a bikes handling; the angle and the length.
The head tube angle refers to the angle of the head tube to the ground and will commonly be described as either slack or steep. A slack head tube angle requires more effort to steer but is typically more stable at high speeds. A steep head tube angle, commonly found on performance road bikes, requires less effort to steer and allows for a fast handling bike. Mountain bikes have a slacker head tube angle than a road bike, providing greater stability on rough, technical trails.
The head tube length is measured from the bottom to the top of the head tube. Bikes with a long head tube raise the front end of the bike, putting the rider in a more upright position. Bikes with a short head tube lower the front end of the bike, placing the rider in an aggressive position designed to reduce the frontal profile of the rider, improving aerodynamics.
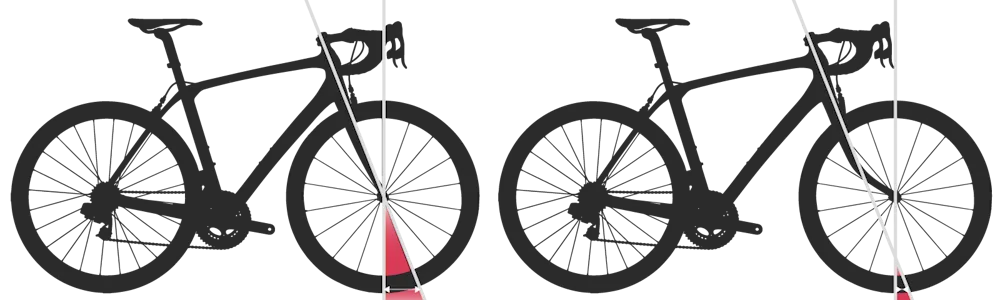
Fork Rake and Offset
Similar to the head tube angle and length, fork rake or fork offset is another key factor in the handling of a bike. To understand fork rake, imagine a straight line continuing from the centre of the fork steerer tube all the way to the ground. The amount that the fork is offset from this imaginary line is known as fork rake in road bikes, or fork offset in mountain bikes. Increasing the offset will make steering faster, conversely decreasing it will slow it down. Fork rake is only part of the steering story, as a greater fork rake will increase the wheelbase, which is a common trait of more endurance focussed bikes thanks to the increased stability provided.
The below image shows an example of how an increase in fork offset or rake, reduces the amount of trail, Speeding up a bicycles handling characteristics.
Trail
The trail of a bike can be a complicated element of bike geometry to understand but stay with us and we’ll break it down for you. Trail is a combination of the head tube angle and the fork rake and can be thought of as the tyre contact point trailing behind the steering axis.
The short explanation is a small amount of trail equals a fast or even twitchy handling bike, while greater trail equals a slow handling bike. Manufacturers will manipulate the headtube angle or amount of fork offset to make the handling suit the needs of a bike.
For example, a performance race bike with a steep headtube and increased fork offset equals a small amount of trail and a fast handling bike. Conversely, an endurance bike with a slack headtube angle and small fork offset equals a large amount of trail and a slow handling bike. The fork rake (offset) can also be manipulated to increase (or decrease) steering speed. Mountain bikes for example typically have head tube angles 70 degrees and below, so in order to speed up the steering, often the forks are offset to greater amounts.
Fast handling requires less rider input but can be described as twitchy when used by an inexperienced rider. Slow handling takes more work to steer, providing greater stability and smoother handling, but is less reactive at speed.

The image above is an example of how a steeper headtube angle reduces the amount of trail and as a consequence will speed up the bike's handling.
Seat Tube
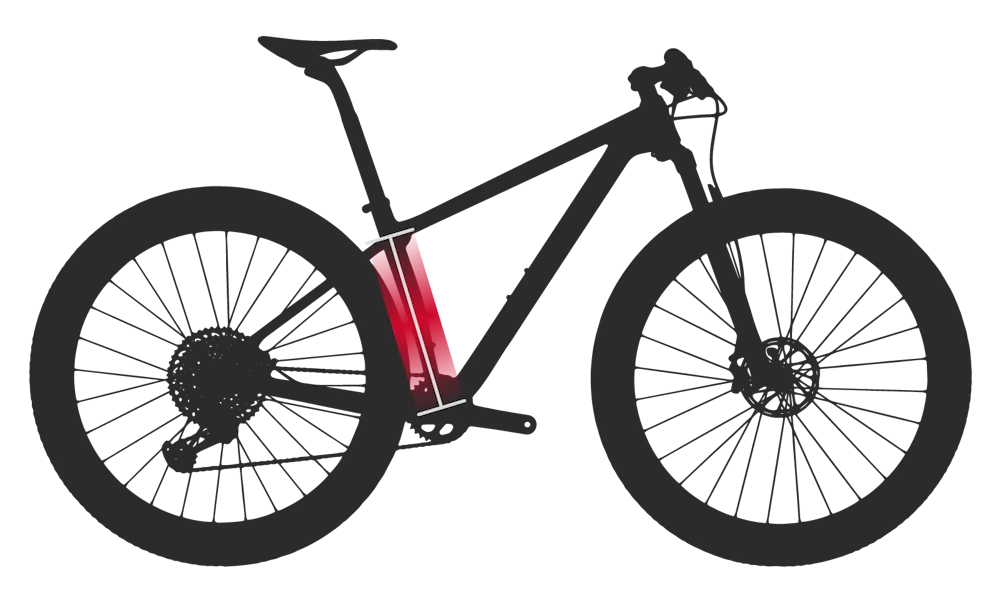
The seat tube angle refers to the angle of the seat tube in relation to the ground. An easy way to think of this is to measure the seat tube angle against an imaginary straight line between the front and rear dropouts. The seat tube angle doesn't change as much as the head tube angle, generally sitting between 71-75 degrees regardless of the chosen discipline.
Seat tube length is measured from either the centre of the bottom bracket to where the top tube and seat tube meet (Centre-Centre or C-C) or to the top of the seat tube (Centre-Top or C-T). Effective seat tube length is another phrase you may encounter which is similar to stack, measuring the distance from the centre of the bottom bracket to where a virtual horizontal top tube would meet the seat tube.
Changing the saddle set back position can also influence the seat tube angle, effectively making it slacker or steeper. Saddle setback is measured horizontally from the tip of the saddle to the centre of the bottom bracket.
Top Tube
The top tube is commonly measured horizontally from the top tube/head tube junction to the seat tube. This measurement is referred to as the effective top tube length and allows a consistent measurement, even when a bike has a sloping top tube.
Where stack and reach measurements are not given, then the horizontal top tube measurement is the best way to compare bike sizes between brands.
Chainstay length
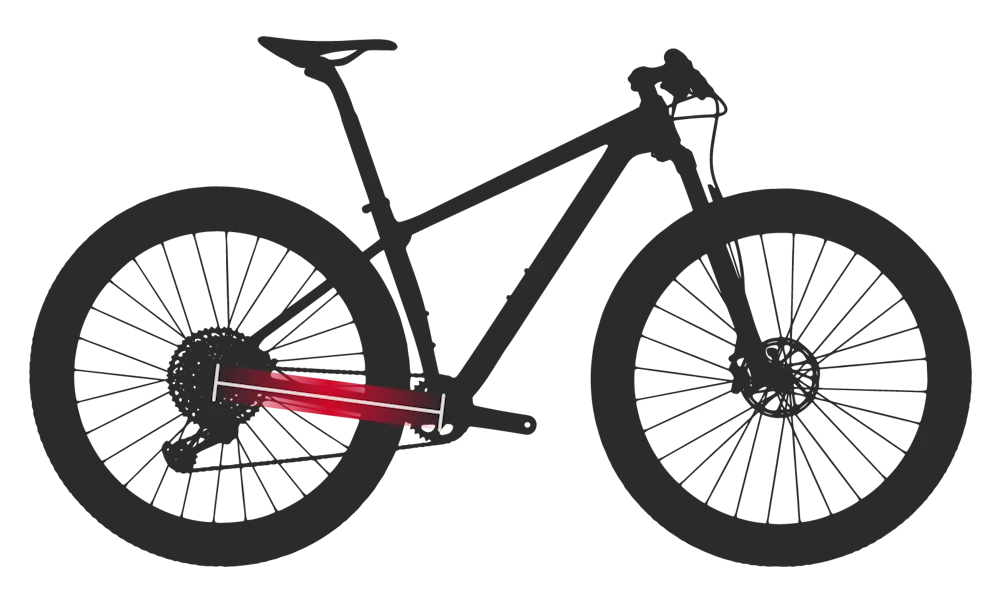
Measured horizontally from the bottom bracket to the rear wheel dropouts, the chainstay length influences the length of the wheelbase and the handling of a bike. A longer chainstay typically improves stability, creating a longer wheelbase in the process, while bikes with short chainstays result in sharper handling.
Wheelbase
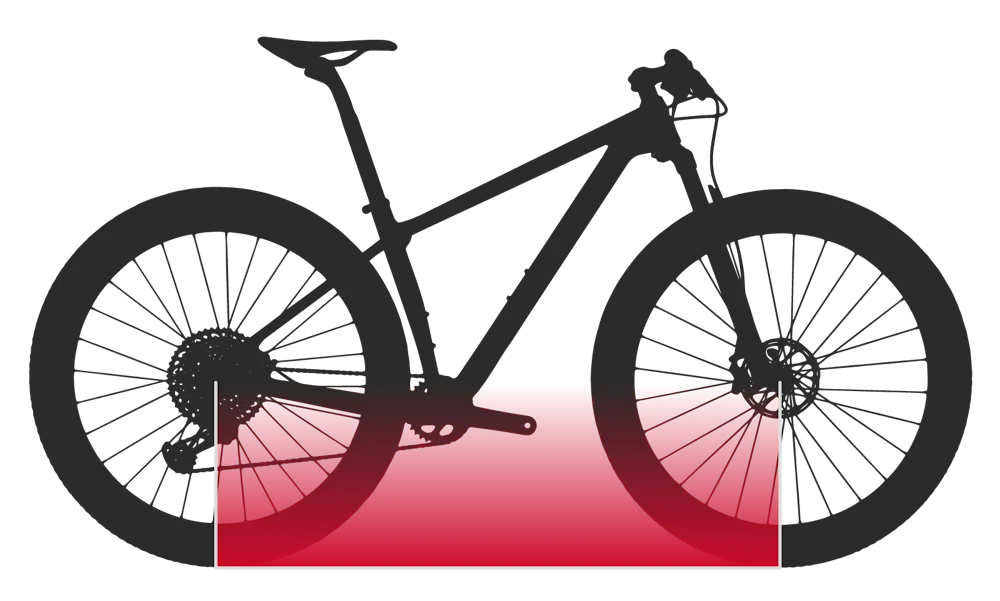
The wheelbase refers to the distance between the front and rear dropouts which coincide with the contact points to the ground at the front and rear wheel. Head tube angle, fork rake, frame reach and chainstay length will dictate the length of the wheelbase. Generally speaking, bikes with a long wheelbase deliver stability and comfort, whereas bikes with a short wheelbase will possess sharper handling.
For example, touring and endurance road bikes offer longer wheelbases compared to more performance-orientated models. Likewise for mountain bikes, where cross-country bikes will offer shorter wheelbases when compared to enduro or downhill mountain bikes.
Bottom Bracket drop
The bottom bracket drop represents the vertical distance between the centre of the bottom bracket and an imaginary horizontal line between the front and rear dropouts. The lower the bottom bracket drop, typically the better the handling, as the rider’s centre of gravity is lowered. Bottom bracket drop will typically range from 60mm - 80mm depending on the purpose of the bike.
While lower is typically better, this does need to be balanced with pedal clearance. Too low of a bottom bracket drop could lead to you dragging your pedals on the ground when cornering. Bottom bracket drop also needs to be balanced with the trail measurement which will dictate the front end of the bikes handling, while bottom bracket drop will impact the handling at the rear, balance is the key.
Often bottom bracket drop is confused with bottom bracket height, which is the distance between the ground and the centre of the bottom bracket. This gives an indication of how much clearance the bike has which is important for mountain bikes that have to negotiate obstacles. By and large, bottom bracket drop is considered a more consistent measurement as it isn't affected by tyre volume.
Other measurements and components
Not all of the measurements on a geometry chart will refer exclusively to the frame. Other measurements will typically refer to interchangeable components that feature on a bike as standard. Read on for a brief overview of each measurement and how it will influence the fit and feel of a bike.
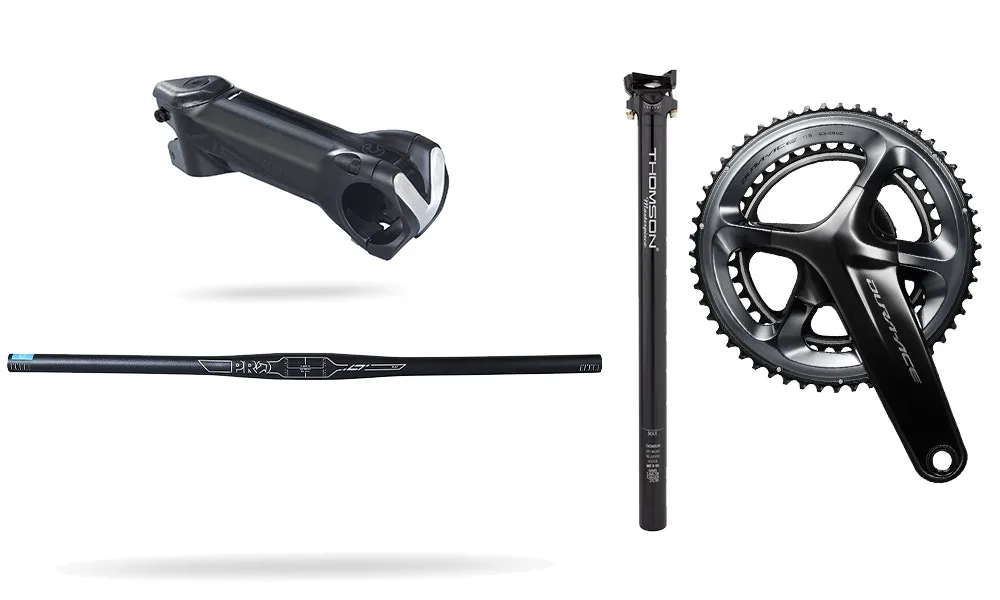
Stem Length
Stem length varies based on bike designation, brand and even frame size and so is often one of the first things changed to suit a rider's flexibility or riding style. Increasing the length of the bike's stem can increase the rider reach, stretching them out and creating a lower frontal profile. Riders may also have a short torso and long limbs or be hyper-flexible which is another reason the standard stem may need to be swapped out. Conversely, a rider with poor flexibility or those who prefer a more upright riding position may opt for a shorter stem.
Stem length is directly linked to the steering arc of the handlebars and so has a huge effect on a bike's handling. For this, most bike manufacturers select stem length based on optimal fit and handling, and so changing the stem length can have negative effects. Generally speaking, shorter stems provide quicker handling, while longer stems slow things down. Stem length is intertwined with how head angle and fork rake affects bike handling – it has become a key ingredient in modern mountain bike design.
Handlebar Width
Handlebar width on road bikes is measured either 'centre to centre' and referred to as 'C-C' or 'outside to outside' and referred to as 'O-O'. Centre to centre is the most common method of measurement and is often horizontally measured from the centre of the bar ends. Outside to outside is measured from the outside of each bar end, hence creating a larger figure. It's important to know which width measurement is being described as a 2cm difference could feel drastically different. It's also important to know that some brands measure their bars at the brake hood clamp area, which may affect the actual size too. Handlebar width follows a similar pattern to stem lengths, the smaller the bike, the narrower the bars. Mountain bike handlebars are always measured as the full width, from end to end.
Narrower bars have the benefit of improving aerodynamics by reducing a rider's frontal profile but can be uncomfortable and create twitchy handling. Wider bars create more stability and greater leverage which is great for sprinting or climbing but can make steering a little slow. As you can imagine, mountain bikes have much wider bars than road bikes to improve stability and control.
Handlebar Reach
Handlebar reach is a measurement on road bike handlebars that is only recently getting attention. It refers to the distance the bar extends forward from the clamp area. It is closely related to stem length, as a short reach handlebar may need to be accompanied with a longer stem. Typically speaking, modern endurance road bikes are coming with shorter reach handlebars, while race-focused models still use a longer reach as it allows for a more aggressive riding position.
Crank Length
Crank length may influence your seat height and potentially other areas such as handlebar height and reach. Most bikes will come with cranks between 170mm and 175mm, but it is possible to get cranks ranging from 165mm to 180mm depending on rider preference.
Our article explaining road bike groupsets delves further into crank length and outlines the pros and cons of choosing shorter or longer cranks.
Seat Post
There are several seat post measurements that may or may not appear on geometry charts and descriptions. In order to prevent returns and help buyers select the right-sized bike, many manufacturers that sell directly to the public with stipulate a maximum saddle height. Although most geometry charts measure the seat tube length to provide the frame size, the length of the seat post may vary depending on whether the seat post is integrated or has restrictions on its extension.
The saddle set back may also appear. This describes how far forward or back the saddle clamp sits from the centreline of the seatpost. Ranges could be anywhere from 0mm-35mm (or greater) depending on the type of bike and manufacturer.
Little to do with geometry, the seat post diameter is also commonly measured and is typically comes in a 27.2mm and 'oversized' 30.9mm or 31.6mm. Oversized seat posts provide stiffness and strength, whereas standard seat posts provide more in the way of comfort. Aero seat posts and plenty of other sizes available means there's no such thing as a standard seatpost diameter.
Now you’ve got an understanding of geometry charts, check out our article on Choosing The Right Bike to put your new found knowledge into action! Alternatively, you can dive straight into the huge range of bikes on offer right here on the leading online bicycle marketplace, BikeExchange.